


Nginx 调优
目录
第一部分 优化版本信息
第二部分 保持连接
第三部分 优化进程数
第四部分 日志分割
第五部分 网页压缩
第一部分 优化版本信息
----------隐藏版本信息----------
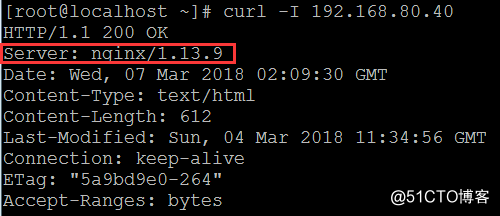
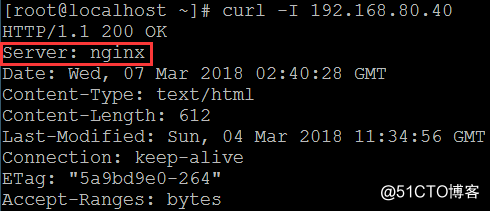
第一步:查看版本信息
方法一:
[root@localhost ~]# curl -I 192.168.80.40
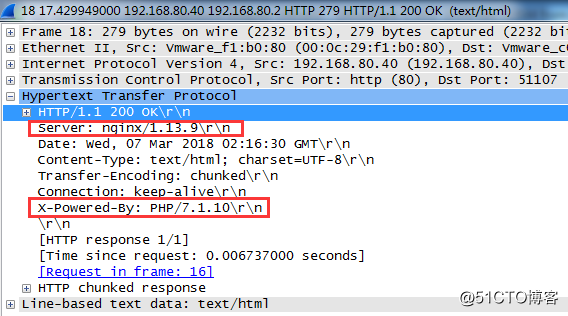
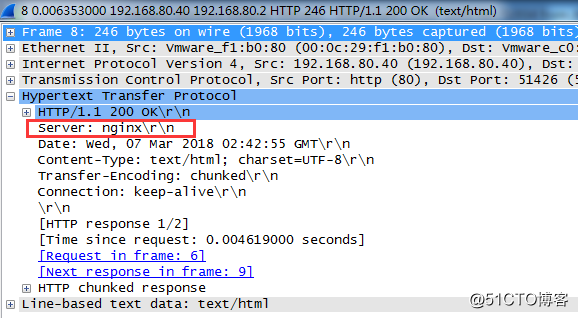
方法二:Wireshark 抓包
Win7 访问 http://192.168.80.40/index.php
(注意:要后缀带 php 文件,才能显示出 php 的信息)

第二步:隐藏版本信息
- 隐藏 nginx 版本
[root@localhost ~]# vi /usr/local/nginx/conf/nginx.conf //编辑主配置文件
添加以下内容:
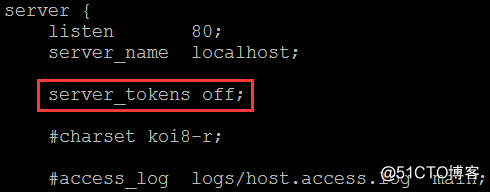
保存退出
[root@localhost ~]# systemctl restart nginx //重启 nginx 服务 - 隐藏 php 信息
[root@localhost ~]# vi /usr/local/php/lib/php.ini
修改以下内容:
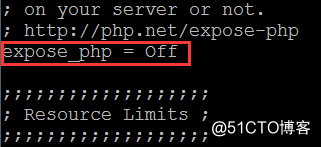
保存退出
[root@localhost ~]# systemctl restart nginx //重启 nginx 服务
第三步:测试验证
方法一:
[root@localhost ~]# curl -I 192.168.80.40
方法二:Wireshark 抓包
访问:http://192.168.80.40/index.php
//已成功隐藏
----------修改 nginx 版本信息---------
(注意,此方法会把现有配置全部删除,建议刚搭建完 nginx 时使用)
一:编辑配置文件
[root@localhost ~]# vi /opt/nginx-1.13.9/src/core/nginx.h
源码目录下修改信息:

保存退出
二:删除安装文件目录并重新编译安装
[root@localhost ~]# cd /usr/local/
[root@localhost local]# rm -rf nginx/ //删除 nginx 安装目录
[root@localhost local]# cd /opt/nginx-1.13.9/ //进入 nignx 解压包目录
[root@localhost nginx-1.13.9]#./configure --prefix=/usr/local/nginx --user=nginx --group=nginx --with-http_stub_status_module //定义配置
[root@localhost nginx-1.13.9]# Make //编译
[root@localhost nginx-1.13.9]# make install //安装
[root@localhost nginx-1.13.9]# killall -1 nginx //安全重启 nginx 服务
[root@localhost nginx-1.13.9]# nginx //启动 nginx 服务
[root@localhost nginx-1.13.9]# netstat -anpt | grep nginx //查看 nginx 运行状态
三:重新访问 http://192.168.80.10,抓包验证

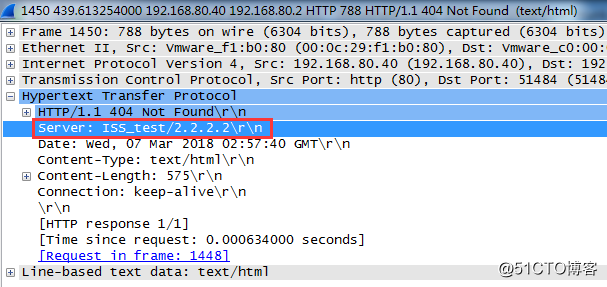
//伪装成功
第二部分 保持连接
一: wireshark 抓包查看连接配置
二: 编辑配置文件
[root@localhost ~]# vi /usr/local/nginx/conf/nginx.conf
编辑以下内容:
keepalive_timeout 65 180; //以后者为准,可以在 http\server\location 设置
client_header_timeout 80; //等待客户端发送请求头的超时时间 超时会发送 408 错误
client_body_timeout 80; //设置客户端发送请求体超时时间
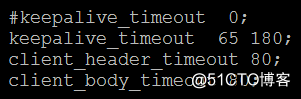
保存退出
(备注:keepalive_timeout 第一个参数指定了与客户端的 keep-alive 连接超时时间,服务器将会在这个时间后关闭连接。可选的第二个参数指定了在响应头 Keep-Alive:timeout=time 中的 time 值。这个头能够让一些浏览器主动关闭连接,这样服务器就不必去关闭连接了。若没有这个参数,Nginx 将不会发送 Keep-Alive 响应头)
[root@localhost ~]# service nginx restart //重启 nginx 服务
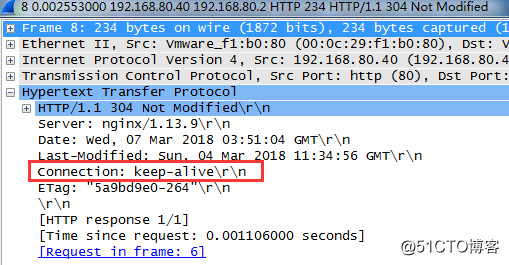
三: 抓包验证结果
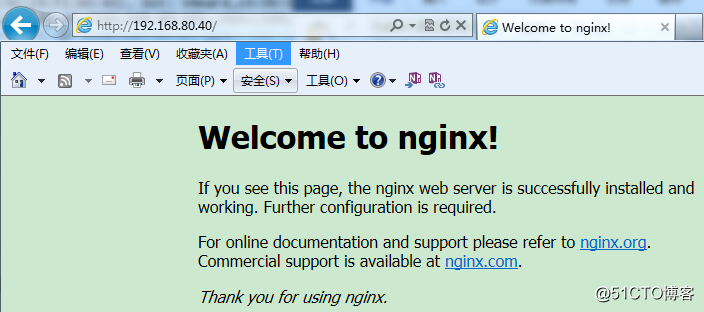
访问 http://192.168.80.40
用 wireshark 抓包
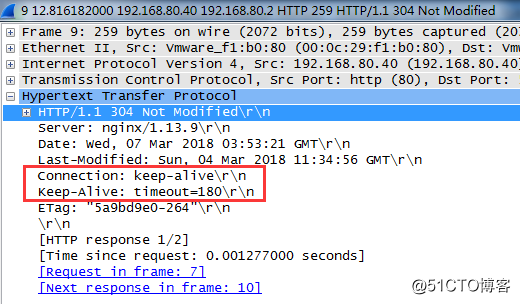
//配置成功
第三部分 优化进程数
将 nginx 服务原来由一个 CPU 核心处理,配置成由多个核心处理,增加处理效率
[root@localhost ~]# cat /proc/cpuinfo | grep "processor" //查看本机处理器

[root@localhost ~]# ps aux | grep nginx

[root@localhost ~]# vi /usr/local/nginx/conf/nginx.conf //编辑 nginx 主配置文件
编辑以下内容:

保存退出
[root@localhost ~]# nginx –t //检查语法错误

[root@localhost ~]# killall -9 nginx //结束 nginx 进程
[root@localhost ~]# service nginx start //启动 nginx 服务
[root@localhost ~]# ps aux | grep nginx //查看 nginx 进程

第四部分 日志分割
Nginx 没有专门的命令来执行日志分割,只能通过脚本实现
[root@localhost ~]# ls /usr/local/nginx/logs/ //查看默认日志
- 编写日志分割脚本
[root@localhost ~]# cd /usr/local/nginx/logs/
[root@localhost logs]# vi fenge.sh //创建日志分割脚本
#!/bin/bash
#filename: fenge.sh
D=$(date -d "-1 day" "+%Y%m%d")
LOGS_PATH="/var/log/nginx" //指定分割日志目录
PID_PATH="/usr/local/nginx/logs/nginx.pid"
[ -d $LOGS_PATH ] || mkdir -p $LOGS_PATH //创建分割日志文件目录(如果存在就不创建,不存在就创建)
mv /usr/local/nginx/logs/access.log ${LOGS_PATH}/aa.com-access.log-$D //移动并重命名分割日志文件
kill -USR1 $(cat $PID_PATH) //重建分割日志文件
find $LOGS_PATH -mtime +30 | xargs rm –rf //超过 30 天自动删除
保存退出 - 执行脚本,测试日志是否被分割
[root@localhost ~]# sh fenge.sh //执行脚本
Win7 访问 http://192.168.80.40
[root@localhost logs]# ls /var/log/nginx/ //查看分割日志,按日期分割了日志文件

- 做计划任务,定期分割日志
[root@localhost logs]# crontab –e
30 1 * sh /root/fenge.sh
(每天的凌晨 1:30 分执行/opt/fenge.sh 脚本,进行日志分割)
第五部分 配置网页压缩
- 修改 Nginx 的配置文件,加入压缩功能参数
[root@localhost ~]# vi /usr/local/nginx/conf/nginx.conf
gzip on; //开启 gzip 压缩
gzip_buffers 4 64k; //表示申请 4 个单位为 16KB 的内存作为压缩结果流缓存,默认值是申请与原始数据大小相同的内存空间来存储 gzip 压缩结果
gzip_http_version 1.1; //设置识别 http 协议版本
gzip_comp_level 2; //指定 gzip 压缩比,压缩比 1 最小,处理速度最快;压缩比 9 最大,传输速度最快,但处理速度最慢,使用默认即可
gzip_min_length 1k; //设置允许压缩的页面最小字节数
gzip_vary on; //让前端的缓存服务器缓存经过 gzip 压缩的页面
gzip_types text/pain text/javascript application/x-javascript text/css text/xml application/xml application/xml+rss; //压缩类型,指哪些网页文档启用压缩功能

保存退出 - 修改网页文件大小
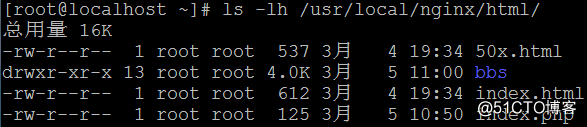
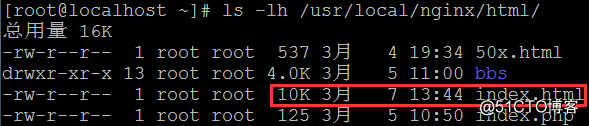
[root@localhost ~]# ls -lh /usr/local/nginx/html/ //查看 html 文件大小
[root@localhost ~]# truncate -s 10k /usr/local/nginx/html/index.html
//由于压缩配置默认为最小 1KB 文件,将 index.html 放大超过 1K
[root@localhost ~]# service nginx restart //重启 nginx 服务 - 验证
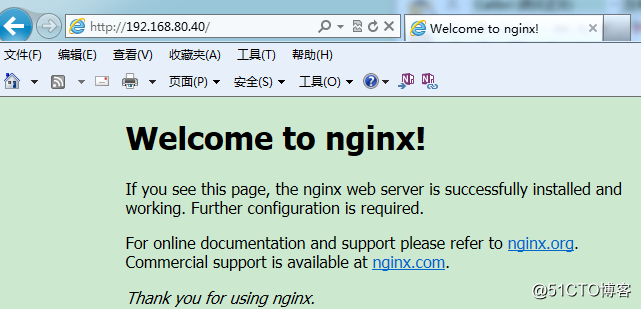
Win7 访问 http://192.168.80.40
用 wireshark 抓包验证结果
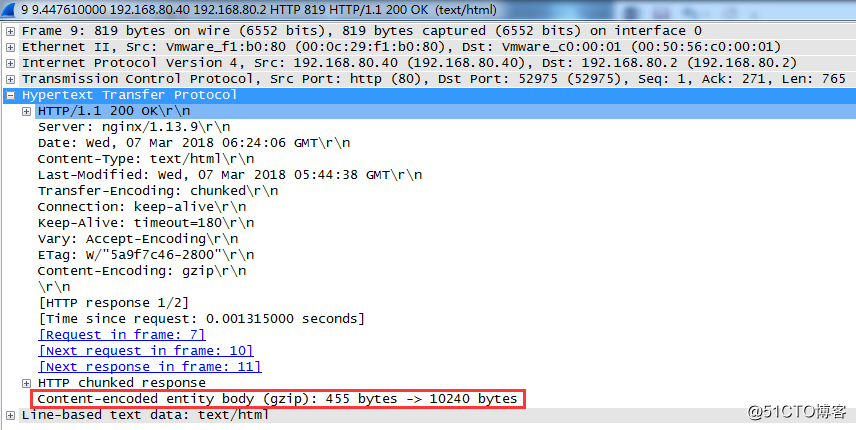
//压缩生效
(注意,如果结果出不来,清除一下浏览器缓存)

评论